 Reviews



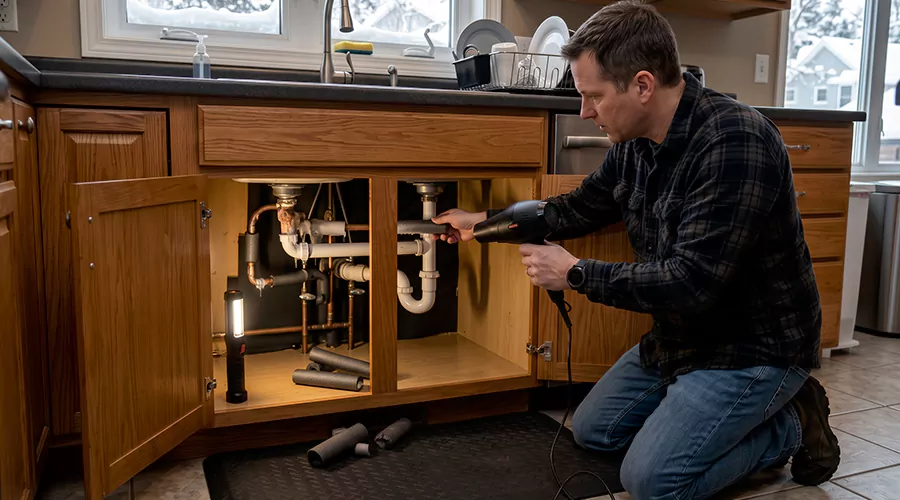
You can unfreeze accessible water pipes by opening the affected faucet and applying gentle heat until normal water flow returns. Start near the faucet and gradually work toward the frozen section. Never use an open flame or expose frozen plumbing to extreme heat. If the pipe is damaged or the freezing has caused a serious leak, emergency plumbing repair may be necessary.
Controlled thawing can sometimes restore water flow within 30–60 minutes. However, thicker ice or extensive freezing can require several hours. The time depends on the pipe's location and the temperature surrounding it. The objective is to melt the obstruction while reducing the risk of damage. A pipe that has already cracked requires a different response.
How Do You Know Which Pipe Is Frozen?
A frozen pipe often causes reduced water flow at one or more fixtures during freezing weather. Comparing faucets can help identify the affected section. If several fixtures have stopped working, the problem may involve shared supply plumbing.
Start by testing the household's water supply.
- Check whether cold water reaches the affected faucet.
- Test the hot-water position separately.
- Compare another fixture in the same room.
- Check a fixture elsewhere in the building.
- Inspect exposed plumbing in vulnerable areas.
- Look for visible frost or unusual pipe distortion.
A frozen hot-water line can cause a different symptom from a frozen cold-water line.
If every fixture has lost water, check for a wider supply interruption before assuming that a single pipe is frozen.
What Equipment Can Safely Thaw Frozen Pipes?
Several methods can provide controlled heat to accessible frozen plumbing. The correct choice depends on the pipe material and the surrounding area. Electrical heating methods require a dry working environment and careful attention to nearby combustible materials.
| Thawing Method | Suitable Application | Main Precaution |
|---|---|---|
| Warm towels | Accessible pipe sections | Replace towels as they cool |
| Hair dryer | Exposed piping | Keep the device moving |
| Electric heating pad | Suitable accessible pipes | Follow product instructions |
| Increased room heating | Plumbing in cold interior spaces | Allow sufficient warming time |
| Approved pipe heating cable | Compatible exposed piping | Follow manufacturer requirements |
| Open flame | Not suitable | Fire and pipe-damage hazard |
The American Red Cross recommends gentle heating methods and warns against using blowtorches or other open flames.
How Do You Prepare to Thaw Frozen Pipes?
Before thawing, locate the main water shutoff and inspect the visible plumbing for damage. A pipe may have cracked while the ice still blocks the opening. Preparing for possible leakage allows you to respond quickly when water begins flowing again.
Follow these steps:
- Identify the faucet affected by freezing.
- Locate the main water shutoff valve.
- Check accessible piping for visible damage.
- Remove stored objects from the work area.
- Keep electrical devices away from water.
- Open the affected faucet slightly.
- Choose an appropriate heating method.
- Prepare to stop if leakage becomes visible.
If a pipe is visibly split, isolate the water rather than attempting to restore normal flow. Do not thaw unknown piping that may be connected to gas or another non-water system.
How Do You Unfreeze Pipes With a Hair Dryer?
A hair dryer can gradually warm an accessible frozen water pipe. Begin near the affected faucet and work toward the suspected frozen section. Keep the dryer moving to distribute heat. Continue observing the pipe as water begins to flow.
Use the following method:
- Open the affected faucet.
- Confirm that the working area is dry.
- Inspect the exposed pipe for damage.
- Position the hair dryer at a suitable distance.
- Begin warming the pipe near the faucet.
- Move the dryer gradually along the exposed section.
- Avoid concentrating heat on one fitting.
- Watch for water beginning to flow.
- Continue until normal flow returns.
- Inspect the pipe for leakage.
A hair dryer is suitable only when electrical safety can be maintained. Do not use one near standing water or damaged electrical equipment.
Can You Unfreeze Pipes With Hot Towels?
Warm towels provide a gradual heating method without placing an electrical appliance directly beside the pipe. They are particularly useful for short exposed sections. The towels must be replaced as they cool because their warming effect decreases over time.
To use this method:
- Prepare towels and warm water.
- Check the pipe for visible damage.
- Open the connected faucet.
- Wrap the accessible frozen section.
- Replace the towels when they cool.
- Monitor the faucet for returning water.
- Continue gradually until flow improves.
- Inspect the pipe and nearby fittings.
Avoid using boiling water. Extremely hot water can damage certain plumbing materials or create a burn hazard during handling.
Can Increasing the Room Temperature Thaw Pipes?
Raising the surrounding temperature can help thaw pipes located inside cold rooms or cabinets. This method is slower than direct heating, but it may be useful when the exact frozen section cannot be identified. The surrounding space must receive sufficient warmth. For example, a kitchen supply pipe installed near an exterior wall may freeze when the cabinet remains colder than the occupied room. Opening the cabinet allows heated indoor air to circulate around accessible plumbing.
Useful precautions include:
- Maintain normal household heating.
- Open cabinet doors when appropriate.
- Keep children away from stored cleaning products.
- Reduce cold drafts around exposed plumbing.
- Monitor the affected faucet.
- Watch for moisture as temperatures rise.
Never place an unattended portable heater inside a cabinet or another confined space.
How Long Does It Take to Unfreeze Pipes?
Thawing time depends on the length of the frozen section and the surrounding temperature. A short exposed pipe may thaw relatively quickly. Concealed piping can take longer because heat must reach the obstruction through surrounding building materials.
The following comparison provides practical expectations rather than guaranteed times.
| Situation | Expected Difficulty | Main Consideration |
|---|---|---|
| Small accessible ice blockage | Lower | Direct gentle heating is possible |
| Long exposed frozen section | Moderate | More ice must melt |
| Pipe inside a cold cabinet | Moderate | Increase surrounding warmth |
| Concealed frozen pipe | Higher | Direct inspection is difficult |
| Frozen underground supply | High | Specialized diagnosis may be required |
| Damaged frozen pipe | Repair required | Thawing alone cannot correct the damage |
Current thawing guidance describes simple cases that may take 30–60 minutes. More extensive freezing can take several hours.
If the situation does not improve, stop rather than applying increasingly aggressive heat.
What Warning Signs Should You Watch During Thawing?
A frozen pipe can begin leaking as the ice melts. The returning flow is useful evidence that thawing is working, but it also means water can reach any existing rupture. Continue inspecting the exposed plumbing throughout the process.
Watch for these warning signs:
- A visible crack becomes wet.
- Water begins dripping from a fitting.
- The pipe appears unusually swollen.
- Moisture forms on a nearby wall.
- Water collects beneath the affected section.
- A connection begins spraying.
- A previously dry cabinet becomes damp.
- Water pressure changes unexpectedly.
- Another frozen section becomes apparent.
- Normal flow returns but a leak remains.
Stop thawing if water begins escaping from damaged plumbing.
Why Should You Start Near the Faucet?
Starting near the faucet helps create a route for melting water to leave the frozen section. An open faucet also provides an outlet for pressure as the ice melts. Heating a section without an available outlet can create additional problems. The exact frozen location may not be obvious. However, beginning near the affected fixture and working gradually along an accessible pipe is a practical method for many household installations. This method should not be used to justify thawing plumbing that is visibly damaged.
What Should You Avoid When Unfreezing Pipes?
Safe thawing depends on controlled heat and continuous observation. Extreme temperatures can damage piping or create a fire hazard. Unattended electrical devices also introduce unnecessary risks.
Avoid these mistakes:
- Using a blowtorch.
- Applying an open flame.
- Pouring boiling water onto pipes.
- Operating a hair dryer near standing water.
- Forcing frozen valves.
- Leaving heating devices unattended.
- Ignoring visible cracks.
- Restoring full pressure to damaged piping.
The American Red Cross warns specifically against propane heaters and other open-flame devices for pipe thawing.
When Should You Call a Professional?
Professional assistance is appropriate when the frozen section cannot be located or safely reached. A pipe that has already split also requires repair before normal water service resumes. Hidden damage can become apparent during thawing.
Seek help when:
- The frozen section is concealed.
- Several household supply lines are affected.
- The main water service may be frozen.
- A pipe has cracked.
- Water appears during thawing.
- Gentle warming does not restore flow.
- Electrical hazards prevent safe access.
Professional thawing may cost around $100 for a simple service. Burst pipe repairs typically cost 200–3,000 in the United States according to 2026 data.
How Can You Prevent Pipes From Refreezing?
Pipes can freeze again if they remain exposed to the same cold conditions after thawing. The immediate solution restores water movement, but longer-term protection requires improving the surrounding environment. Insulation and adequate heating are common preventive measures.
Recommended actions include:
- Insulate exposed piping.
- Maintain suitable indoor heating.
- Open cabinet doors during severe cold when appropriate.
- Seal drafts around vulnerable plumbing.
- Disconnect outdoor hoses before freezing weather.
- Follow approved heat-cable instructions where applicable.
- Winterize unused buildings correctly.
The American Red Cross recommends maintaining indoor temperatures of at least 55°F when a property is left unattended during cold weather.
Conclusion
Learning how to unfreeze pipes starts with identifying the affected section and preparing for possible leakage. Open the connected faucet before applying gentle heat. Warm exposed plumbing gradually and keep electrical devices away from water. Once flow returns, inspect the pipe for damage. Hidden freezing or visible cracks may require professional attention. This week, check exposed plumbing and improve protection in areas that become unusually cold.
Frequently Asked Questions
Can I unfreeze pipes without a hair dryer?
Yes. Warm towels or increased room heating can help thaw suitable accessible pipes.
Should the faucet remain open while thawing?
Yes. An open faucet provides an outlet as the ice melts.
Can hot water from another faucet thaw frozen pipes?
Warm towels may help with accessible sections. Avoid pouring boiling water over frozen plumbing.
Why is my pipe still frozen after an hour?
The ice blockage may be extensive or located in a concealed section that has not received enough warmth.
Is it safe to turn the water back on immediately?
Only after the affected pipe has been checked for damage and the plumbing is ready for normal operation.